

Displaying the nearest location to your visitor without requiring a search is a commonly recommended approach for helping your user quickly connect to your local presence. This information may be useful to display outside the context of your "locations" page, such as directly in your Website's header.
This tutorial describes the creation of a compact interface that can display a single result that represents the nearest location as detected by MetaLocator's built-in IP detected location technology.
This involves two steps. The first is creating a minimal interface that displays only the first result as "Your nearest location is....". The second step is the addition of the form above it which can redirect to another page to display the full results.
Step 1: Creating a minimal, compact interface
Create a new interface using the default settings, and make the following changes:
Layout Settings: Show A Map > No
Layout Settings: Directory Width: 100%
Layout Settings: Directory Height: 100%
Form Settings: Remove all form fields from the "Search Form". It should look like this:
Template Settings: Directory Item Template:Your nearest location is {title}
Data Settings: Maximum Number of Results Per Page of Search Results: 1
GeoLocation Settings: Autofind user and display results: Yes
Autofind Search Radius: 10000 This ensures a result is always displayed regardless of how far away it might be.
Legacy Settings: Choose a style: No Style This reduces the amount of CSS we need to write to simplify the layout.
Style & Color Settings: Auto-size IFRAME: No
Style & Color Settings: Frame Added Height: 0
Style & Color Settings: CSS:.com_locator_forms,.locator_form_buttons{display:none;}.metalocator .com_locator_results_wrapper{border:none;}.com_locator_entry{border-bottom:none;}.metalocator .com_locator_results_wrapper{height:auto;}h2.com_locator_title { display: inline;font-weight: normal;}.com_locator_results_wrapper .com_locator_entry:hover { background-color: transparent;}/* these are specific to our example */.com_locator_address,h2.com_locator_title{color: #dddddd;}.metalocator{font-family: "Montserrat", Helvetica, Arial, sans-serif;}
With the above changes in place, our interface preview looks like this:
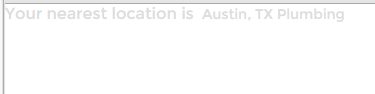
This example is created on a website with a dark background, so our example CSS changes the font to a light grey. Once installed on our example Website using the IFRAME method, it looks like this:
We used the IFRAME method to exactly control the height of the resulting display.
The next step involves creating a simple form just above the IFRAME code we added to our Website. That form is simply two inputs as described in this tutorial.
With the above changes, a compact search form can be seamlessly embedded in your Website header, sidebar or any other location requiring a compact presentation.
To see this in action, check out the live example at wordpress.metalocator.com. Questions or comments integrating this example? Contact our helpdesk.